Blender For Vfx - Learn To Add Realistic Cgi Into Footage
Last updated 3/2018
MP4 | Video: h264, 1280x720 | Audio: AAC, 44.1 KHz
Language: English | Size: 2.47 GB | Duration: 8h 1m
Learn to use Blender in a professional workflow to create photorealistic CGI renders for your own visual effects shots!
What you'll learn
Matchmove the real camera motion using Blender
Match the lighting in a background video
Model a spaceship
UV unwrap a spaceship
Create complex shading networks for realistic shading
Paint textures in Blender
Use the sculpting features in Blender
Requirements
Blender 2.79
Basic knowledge of Blender such as viewport navigation and interface
Description
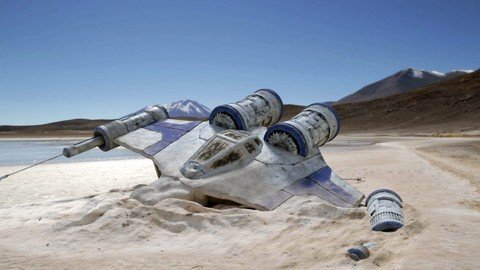
In this course you will create a model of a crashed spaceship and integrate it into background video footage all using Blender!
Blender is an amazing and powerful piece of software which is FREE. You can use it to create commercial work and for your own freelance work.
You will start by using Blenders built in camera tracker to match the movement of the real camera. You will then use Blender to create the model and UV unwrap it so you can paint textures on the spaceship. Using Blenders excellent built in renderer called Cycles, you will create realistic lighting and shaders. Finally you will apply the final look using Blenders built in compositor!
This course is for anyone who wants to learn about creating realistic images in Blender. Its also great for 3d artists who want to know more about Blender and what it can do.
SIgn up today to start creating awesome images!
Overview
Section 1: Camera tracking the shot
Lecture 1 Importing video and exporting an image sequence
Lecture 2 Start tracking by adding your first track
Lecture 3 Add more tracks and solve the camera
Lecture 4 Improve the solve by adjusting keyframes
Lecture 5 Line up the scene and ground model
Lecture 6 Add more tracks and create the ground plane
Section 2: Modeling the ship and UV unwrap
Lecture 7 Setup background reference images
Lecture 8 Block out the engines and lasers
Lecture 9 Block out the basic shape of the ship body
Lecture 10 Block out the cockpit
Lecture 11 Add details to the lasers
Lecture 12 Add detail to the laser tips
Lecture 13 Add detail to the cockpit
Lecture 14 Add details to the engines
Lecture 15 Add nose detail
Lecture 16 Add details to the wings
Lecture 17 Finishing the model and clean up
Lecture 18 UV unwrap the cockpit
Lecture 19 UV unwrap the body
Lecture 20 UV unwrap the lasers
Lecture 21 UV unwrap the engines
Section 3: Layout
Lecture 22 Line up model with the camera track
Lecture 23 Check the track and layout with a preview
Section 4: Lighting and look development
Lecture 24 Setup lighting usings Cycles renderer
Lecture 25 Sculpt ground
Lecture 26 Create a camera map shader
Lecture 27 Enable the node wrangler add-on
Lecture 28 Paint a mask for the transparency of the ground
Lecture 29 Create a shader and dirt texture
Lecture 30 Add noise texture to the dirt base
Lecture 31 Add detail to the ground texture using noise
Lecture 32 Paint the blue sections of the wings
Lecture 33 Paint blue blue sections to the lasers and engines
Lecture 34 Create the cockpit glass shader
Lecture 35 Paint sand areas using a stencil texture
Lecture 36 Add the sand texture to the body shader
Lecture 37 Add sand texture to the engine and laser shader
Lecture 38 Introduction to the Principled BSDF shader
Lecture 39 Add specular textures to all shaders
Lecture 40 Sculpt damage to the spaceship
Section 5: Rendering and Compositing
Lecture 41 Setup renderlayers
Lecture 42 Input the render settings
Lecture 43 Setup color management and compositor
Lecture 44 Look at your final render
Anyone who wants to create realistic visual effects in Blender,Anyone who wants to learn to track or matchmove camera in Blender
Homepage
https://www.udemy.com/course/blender-vfx/
Fikper
Rapidgator
jrpxf.Blender.For.Vfx..Learn.To.Add.Realistic.Cgi.Into.Footage.part1.rar.html
jrpxf.Blender.For.Vfx..Learn.To.Add.Realistic.Cgi.Into.Footage.part2.rar.html
jrpxf.Blender.For.Vfx..Learn.To.Add.Realistic.Cgi.Into.Footage.part3.rar.html
Uploadgig
NitroFlare
⚠️ Dead Link ?
You may submit a re-upload request using the search feature.
All requests are reviewed in accordance with our Content Policy.
In today's era of digital learning, access to high-quality educational resources has become more accessible than ever, with a plethora of platforms offering free download video courses in various disciplines. One of the most sought-after categories among learners is the skillshar free video editing course, which provides aspiring creators with the tools and techniques needed to master the art of video production. These courses cover everything from basic editing principles to advanced techniques, empowering individuals to unleash their creativity and produce professional-quality content.
Comments (0)
Users of Guests are not allowed to comment this publication.